Contouring & Highlighting To Create A Natural Glow
Step 1: Eye Makeup
Apply your eyeshadow first so if you have any "powder fall" on your face, you can cleanse with makeup remover before you start on your skin. And EEK.... this is me baring my "naked" skin to the world!

Photos by Marcus Edwards Photography
Step 2: Foundation
Apply your primer and foundation as normal. I chose MAC Prep+Prime Skin, Face+Body Foundation and a BeautyBlender Sponge. It's a light coverage that evens out your skin and gives your face a base.
Step 3: Highligher
Select a shade of cream foundation or concealer that's a shade or two lighter than your skin, in noticeable contrast to your normal skin. I used MAC Full Coverage Foundation. I also recommend Temptu Concealer Wheel.
Use a sponge to apply the lighter foundation on the center of your forehead, taper to a thin line as mover down the center of your nose. Continue the line in the dip right above your lips. Apply underneath your eye and widening to cover the outer edge of your nose. Always ensure it's even on both sides. Apply a small circle on your chin and under the outer arches of your eyebrows.
Step 4: Contour
Select a shade of cream foundation or concealer that's a shade or two darker than your skin, in noticeable contract to your normal foundation. I used MAC Full Coverage Foundation. I also recommend Temptu Concealer Wheel.
Use a sponge to apply to the outer edges of your chin, below your lip, on the outside of your nose, and the outer edges of your forehead. Apply rounded lines from your temples to below your cheekbones, stopping about three fingers width away from the corners of your lips. For cheeks, dab a light pink cream blush in the apples of your cheeks.
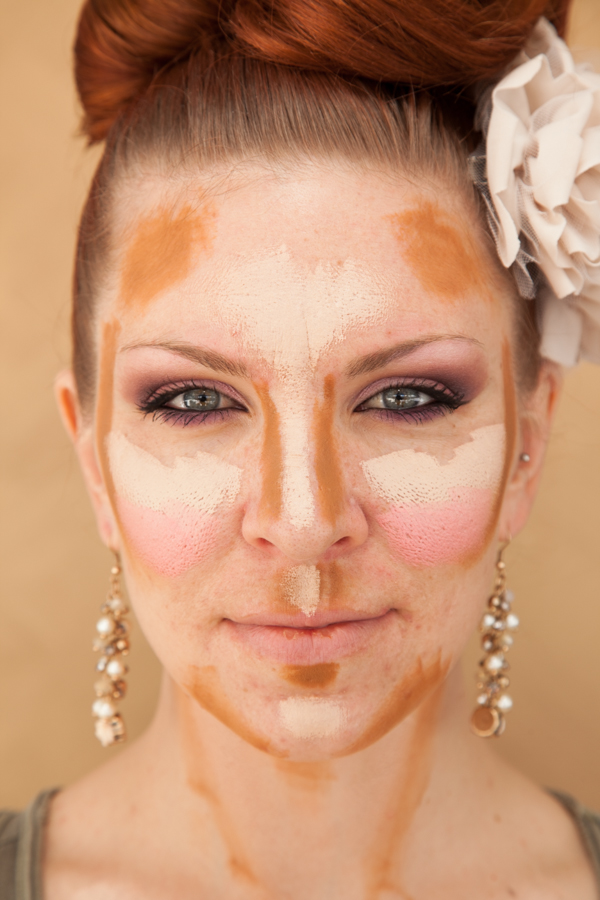
Photos by Marcus Edwards Photography
Step 5: Blend
With the BeautyBlender, start stippling (bouncing) the sponge on the highlighter area to blend. Next, blend the blush, and finally blend in the contour color with the same technique.
Step 6: Step Back & Observe
Are there any spots you've missed? Do you need to blend more? Stepping back and giving your newly-contoured face the once-over can make the difference between "okay" makeup and a beautiful face. Mixing highlighting and contouring helps to bring out your most prominent features while erasing flaws. Just remember, dark colors take away and light colors bring forth.
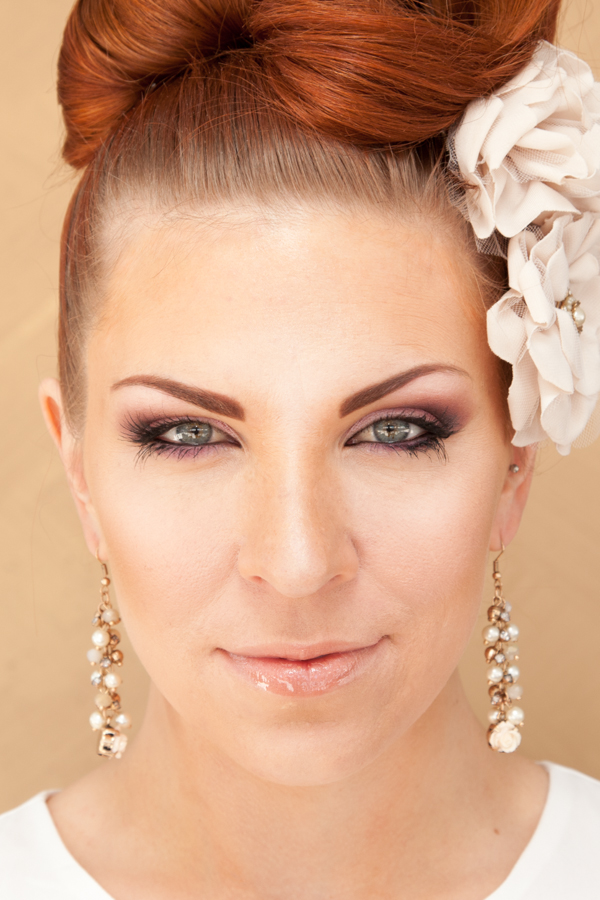
Photos by Marcus Edwards Photography

Featured in Feb/March 2014 magazine